Guide to Configuring and Customizing the Booking Widget
The RentalWise Booking Widget allows you to seamlessly integrate your booking system into your custom website, letting guests check availability, select dates, and enter booking details — all while finalizing their reservation through a RentalWise-powered checkout page.
This guide will help you understand how to access, configure, and embed your Booking Widget.
 How the Booking Widget Works
The Booking Widget is designed for hosts and property managers who want to maintain their own website while still using RentalWise for secure and automated booking processing.
Guests browse your website as usual.
When they select dates or click “Book Now,” the widget redirects them to your RentalWise checkout page, where the booking is finalized.
 Important Notes
The widget code operates at the property level, meaning each property has a unique widget code.
If you want to create a search functionality on your custom website (e.g., a multi-property search bar), you’ll need to implement it using the RentalWise OpenAPI.
 API Documentation:
https://www.rentalwise.com/support/developers/api-documentation
 A. Getting the Widget Code
Follow these steps to retrieve and embed your widget:
Access the Property:
Go to PMS → Property → Website Tab in your RentalWise account.
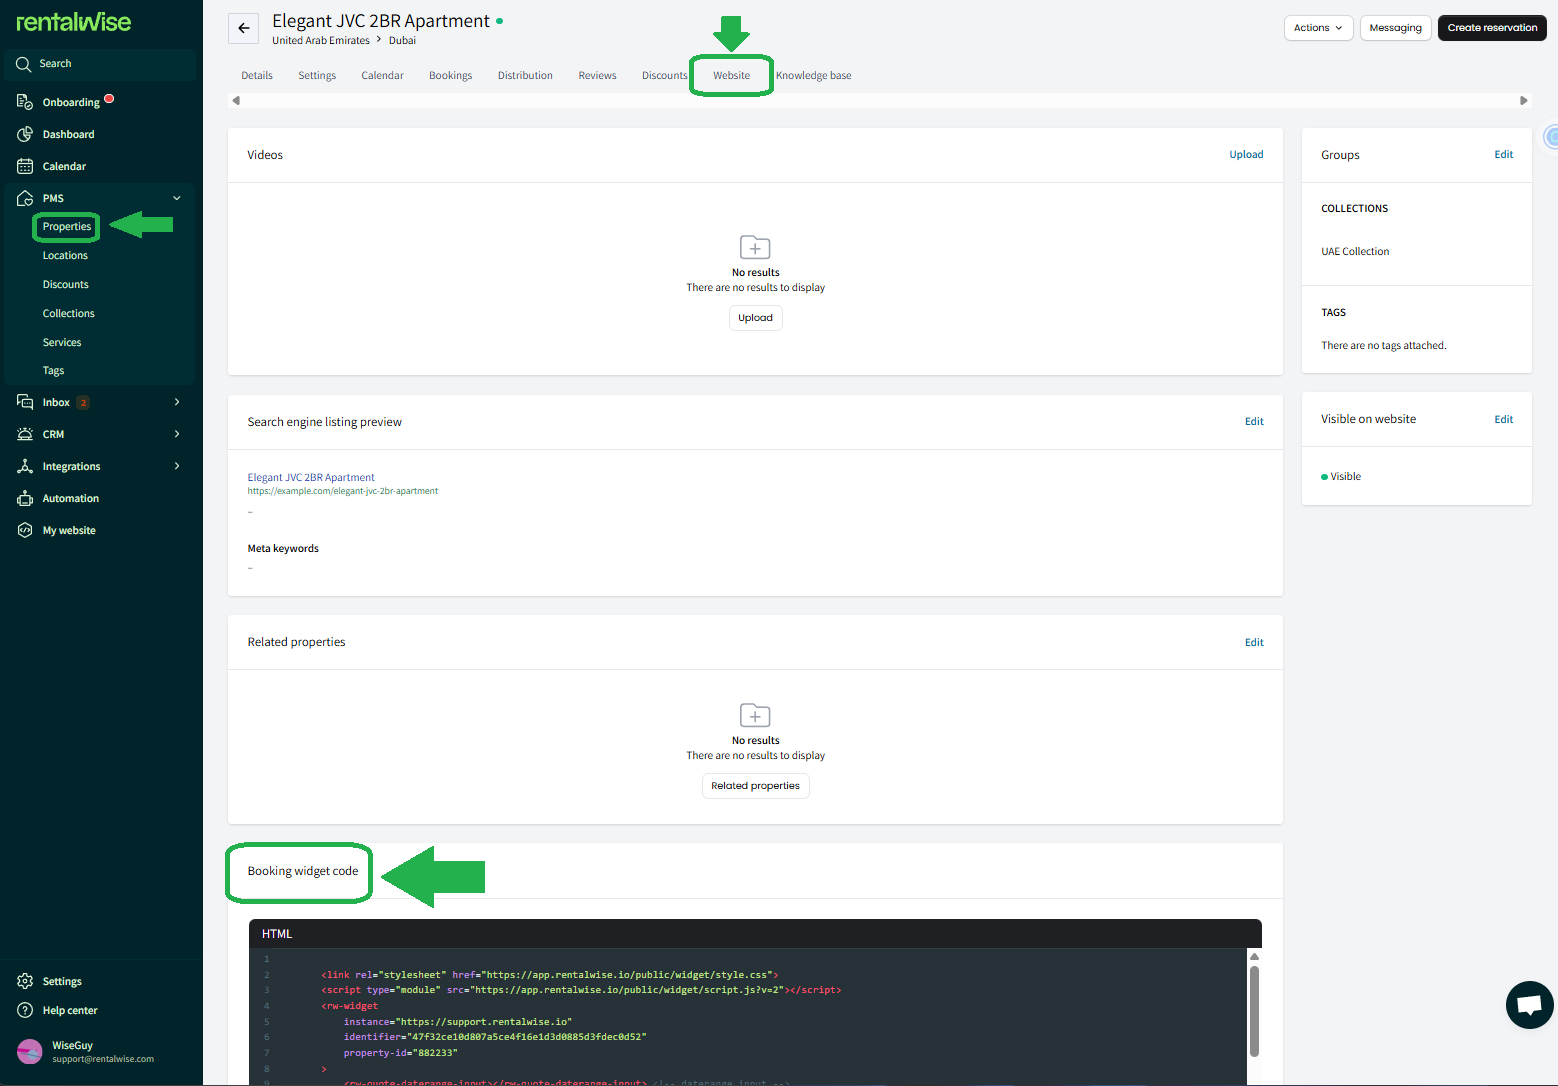
Copy the Widget Code:
Under the Website Tab, locate the Booking Widget Code section.
Copy the entire code snippet.
Embed the Code on Your Website:
Paste the copied widget code into the desired section of your custom website’s HTML (for example, on a “Book Now” or “Availability” section).
Save & Test:
Save your changes and test the integration to confirm the widget displays correctly and redirects to the RentalWise checkout page as expected.
Additional Customization Options
You can customize various elements of the widget to match your preferences and branding. Below are the available options:
1. RW-WIDGET
Default Settings:
The date format will always be
YYYY/MM/DD.The calendar cannot be configured to start on Sunday or Saturday; it defaults to Monday through Saturday (Mon-San).
To Preselect Search Parameters:
You can add predefined search parameters to generate a quote automatically.
Example:
<rw-widget instance="https://your-subdomain.rentalwise.io" identifier="your-property-unique-identifier" property-id="your-property-id" start-date="2024-12-10" end-date="2024-12-14" adults="5" coupon="Happy"> </rw-widget>
2. RW-QUOTE-DATERANGE-INPUT
Customizable Options:
Label: Set a custom label for the date picker.
Example:label="Book your Dates"Placeholder: Add placeholder text for the date input.
Example:placeholder="Select a date"Calendar Placement: Configure the placement of the calendar popup. Options:
top,left,right,bottom.
Example:calendar-placement="top"Locale: Change the calendar language. Available options include German, Portuguese, Spanish, French, Italian, Dutch, and Greek.
Example:locale="French"Date Format: By default, it is
YYYY/MM/DD. Refer to Date-Fns Documentation for more options.
Example:
<rw-quote-daterange-input label="Book your Dates" placeholder="Add a date" calendar-placement="bottom" locale="Spanish"> </rw-quote-daterange-input>
3. RW-QUOTE-GUESTS-INPUT
Customizable Options:
Adults Label: Set a custom label for adults.
Example:adults-label="Guests"Children Label: Set a custom label for children.
Example:children-label="Kids"
Example:
<rw-quote-guests-input adults-label="Guests" children-label="Kids"> </rw-quote-guests-input>
4. RW-QUOTE-COUPON-INPUT
Customizable Options:
Label: Set a custom label for coupon input.
Example:label="Discounts"Placeholder: Add placeholder text for coupon entry.
Example:placeholder="Enter coupon code"
Example:
<rw-quote-coupon-input label="Discounts" placeholder="Enter coupon code"> </rw-quote-coupon-input>
5. RW-QUOTE-RESULT
The <rw-quote-result> tag displays details once a quote is generated. You can customize the following elements:
Products: Displays quote components like accommodation and cleaning fees.
Total: Displays the total price of the booking.
Book Button: Takes the user to your RentalWise website to finalize the booking.
Example:
<rw-quote-result> <div> <rw-quote-products></rw-quote-products> <rw-quote-total></rw-quote-total> <rw-quote-book-button label="Request"></rw-quote-book-button> </div> </rw-quote-result>
6. RW-QUOTE-ERROR
Use the <rw-quote-error> tag to display errors, if any, during the quote generation process.
Example:
<rw-quote-error></rw-quote-error>
7. RW-QUOTE-NO-RESULTS
Customize the message displayed when no quote is generated.
Example:
<rw-quote-no-results> <div style="text-align: center; margin-top: 20px;">Please select your dates</div> </rw-quote-no-results>
8. RW-QUOTE-IS-LOADING
Customize the message displayed while the quote is loading.
Example:
<rw-quote-is-loading> <div style="text-align: center; margin-top: 20px;">Loading quote</div> </rw-quote-is-loading>
Summary
For the Search functionality, connect via API.
Customize the additional options, such as date inputs, labels, placeholders, and messages, to match your website’s branding and guest experience.
Use preselected parameters for automatic quote generation, if desired.
This guide ensures seamless integration and customization of the Booking Widget for your website.